ArchiMate - Archi Tips and Tricks
This article is part of the The ArchiMate Series
UPDATE: Checkout the ArchiScribe MCP Server
The Archi application is an excellent, mature ArchiMate editor which is very easy to use. If you are just starting out then I highly recommend the Archi User Guide, it's a relatively light read with lots of time-saving information.
Below are some additional tips and tricks which I use on a regular basis:
Element Properties
Element Properties are a name / value list where you can add related details to your model elements, just select an element on a view, then navigate to the Properties tab. By adding element properties, you can search and filter your model in lots of useful ways. The built-in search box even lists your property names making it easy to find what you need.
Here are some suggested properties to add to your elements:
- Repo - useful for application components, it helps you quickly navigate to the related code in the code base
- Status - I don't add this property to every element but usually add a status of "Future" to elements which don't exist yet or "Deprecated" to elements on their way out
- Stereotype - great for adding domain specific terminology to your elements, more below
Label Expressions
Label Expressions is a great feature that was introduced in Archi 4.7, it allows you to expose more details on your diagrams. Just select an element on a view, then navigate to the Label tab. Some example expressions:
Example Label Expression 1:
(${type})
${name}
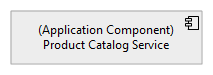
Fig 1. shows an element using a Label expression which takes the element {type} & {name} and renders them on separate lines.
Example Label Expression 2:
«${property:Stereotype}»

Type: ${type}

Name: ${name}

Documentation:
${documentation}

Repo: ${property:Repo}
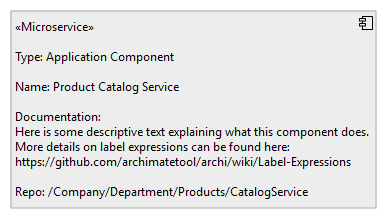
Fig 2. shows the same element from example 1 but with a different Label Expression to show additional details.
Specialisation with Stereotypes
In the Specialization of Elements and Relationships section of the ArchiMate specification, it states that: "The stereotype notation with angled brackets may also be used to denote a specialised concept."
Fig 3. shows a Business Actor with a specialisation of «Organisation Unit» and an Assignment Relationship with a specialisation of «Temporary Assignment». The specialisation name is wrapped in Guillemet characters, making it clear to the reader that a specialised concept is being represented.

A stereotype can be added to an element as an Element Property and rendered using a Label Expression as described above.
«${property:Stereotype}»
${name}
To create Guillemet characters on MS Windows use the following:
- "«": hold down the Alt key and type 174
- "»": hold down the Alt key and type 175
Note: this only works with the number keypad, not the numbers along the top of your keyboard or you can copy/paste from here.
Multi-line Element Names
As of Archi v4.2, there is no way to include a line break in the name of an element, long text wraps based on the width of the element.
UPDATE: This has changed somewhat as of v4.7, the Label Expression feature gives us the ability to add details in multiple lines, however a long name still wraps based on the width of the element so this tip is still useful.
This trick gives us some control over where line breaks occur in the element name, by grouping words together.
Fig 4. shows a Business Process element which has a name of "1st Line 2nd Line 3rd Line". As you can see in the first element, the line break occurs on the space after "2nd" and we really want it to occur on the space before "2nd".
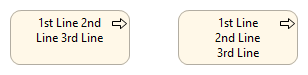
By adding non-breaking space characters between the words we want to keep together it forces the line breaks to occur on the normal spaces, i.e. after "1st" will keep "1st Line" together, after "2nd" will keep "2nd Line" and after "3rd" will keep "3rd Line" together.
Creating a non-breaking space character varies between environments, see the keyboard entry methods section in this "non-breaking space" Wikipedia article for more information. For Example, to create a Non-Breaking Space character on MS Windows use the following:
- hold down the Alt key and type 255
Note: this only works with the number keypad, not the numbers along the top of your keyboard.
Finer Layout Control
When laying out a view the elements snap to a grid to allows for easy alignment of elements. The default grid size (of 12) works well in most cases but if you would like finer control of the layout then setting to grid size to a smaller value is helpful.
From the Edit menu, go to Preferences/Diagram/General/Grid Size, I usually set it to 6.
Default Figures
I prefer the clean box figures in Archi as they give a more consistent look and feel to the views. I change the default figures for the following elements; Application Component, Device and Node.

From the Edit menu, go to Preferences/Diagram/Default Figures.
Alternative Colour Scheme
If you don't like the default colour scheme you can create your own. See the Archimate Muted Colour Scheme article for more information.
Further Reading
- The example ArchiMate model is available from downloads section on the introduction page
- Multi line object names topic on the Archi Forum